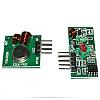
يكي از پراستفاده ترين مدارهاي الكترونيكي ، مدارهاي كنترل از راه دور ميباشد. روز به روز بر تعداد تجهيزاتي كه انتقال اطلاعات و كنترل را بصورت wireless انجام ميدهند افزوده ميشود . ماژولهاي فرستنده و گيرنده mx-fs-03v و mx-05v يكي از ساده ترين ماژولهاي انتقال اطلاعات به شمار ميروند . انتقال اطلاعات در اين ماژولها تنها از طريق 1 پين صورت ميپذيرد.و در مواردي كه از نظر تعداد پايه هاي آردوينو با محدوديت مواجه هستيم ، اين ويژگي ميتواند بسيار مفيد باشد.
 مشخصات فرستنده mx-fs-03v:
برد فرستنده : 20 تا 200 متر
ولتاژ تغذيه : 3.5 تا 12 ولت
سرعت انتقال اطلاعات : 4kB/s
توان فرستنده: 10mw
فركانس مدولاتور:433Mhz
 مشخصات گيرندهmx-05v:
ولتاژ تغذيه : 5 ولت
حساسيت گيرنده:105db-
فركانس اسيلاتور:433.95Mhz
 كاربردها:
سیستم های امنیتی بی سیم
دزدگیر
درب باز كن
کنترل از راه دور
فرستنده وگیرنده اطلاعات
ارسال اطلاعات سنسور و...
در برنامه زير مقدار آنالوگ خوانده شده از ورودي A0 از طريق ماژول فرستنده ارسال ميشود.
کد:
/*
#
# Example code for MX-FS-03V RF TRANSMITTER
# Company : AftabRayaneh
# Website : http://shop.aftabrayaneh.com
# Editor : mohammad omidvar - max
# Date : 19.10.2013
# Version : 1.0
*/
/*
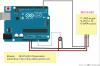
Tx MODULE CONNECTIONS:
PIN DESCRIPTION ARDUINO PIN
1 GND GND
2 VCC (3.5-12V) VCC
3 TX DATA D2
*/
/*Include the VirtualWire library */
#include <VirtualWire.h>
/* Digital IO pin that will be used for sending data to the transmitter */
const int TX_DIO_Pin = 2;
void setup()
{
pinMode(13, OUTPUT);
/* Initialises the DIO pin used to send data to the Tx module */
vw_set_tx_pin(TX_DIO_Pin);
/* Set the transmit logic level (LOW = transmit for this
version of module)*/
vw_set_ptt_inverted(true);
/* Transmit at 2000 bits per second */
vw_setup(2000); // Bits per sec
}
/* Main program */
void loop()
{
/* Temporarily holds the value read from analogue input A0 */
unsigned int Data;
/* The transmit buffer that will hold the data to be
transmitted. */
byte TxBuffer[2];
/* Read the analogue input A0... */
Data = analogRead(A0);
/* ...and store it as high and low bytes in the transmit
buffer */
TxBuffer[0] = Data >> 8;
TxBuffer[1] = Data;
/* Turn on the LED on pin 13 to indicate that we are about
to transmit data */
digitalWrite(13, HIGH);
/* Send the data (2 bytes) */
vw_send((byte *)TxBuffer, 2);
/* Wait until the data has been sent */
vw_wait_tx();
/* Turn off the LED on pin 13 to indicate that we have
now sent the data */
digitalWrite(13, LOW);
/* Do nothing for a second. Lower this delay to send
data quicker */
delay(1000);
}
برنامه زير عدد ارسال شده را توسط ماژول گيرنده دريافت كرده و از طريق serial monitor نمايش ميدهد.
کد:
/*
#
# Example code for MX-05V RF RECEIVER
# Company : AftabRayaneh
# Website : http://shop.aftabrayaneh.com
# Editor : mohammad omidvar - max
# Date : 19.10.2013
# Version : 1.0
*/
/*
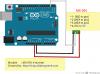
Rx MODULE CONNECTIONS:
PIN DESCRIPTION ARDUINO PIN
1 GND GND
2 RX DATA D2
3 RX DATA N/A
4 VCC (5V) VCC
*/
/*Include the VirtualWire library */
#include <VirtualWire.h>
/* Digital IO pin that will be used for receiving data from the receiver */
const int RX_DIO_Pin = 2;
void setup()
{
pinMode(13, OUTPUT);
Serial.begin(9600);
/* Initialises the DIO pin used to receive data from the Rx module */
vw_set_rx_pin(RX_DIO_Pin);
/* Receive at 2000 bits per second */
vw_setup(2000);
/* Enable the receiver */
vw_rx_start();
}
/* Main program */
void loop()
{
/* Set the receive buffer size to 2 bytes */
uint8_t Buffer_Size = 2;
/* Holds the recived data */
unsigned int Data;
/* The receive buffer */
uint8_t RxBuffer[Buffer_Size];
/* Has a message been received? */
if (vw_get_message(RxBuffer, &Buffer_Size)) // Non-blocking
{
/* If so, then turn on the LED connected to DIO 13
to indicate this */
digitalWrite(13, HIGH);
/* Store the received high and low byte data */
Data = RxBuffer[0] << 8 | RxBuffer[1];
/* Output this data to the UART */
Serial.print("Analogue pin A0: ");
Serial.println(Data);
/* Turn off the LED on pin 13 to indicate that the
data has now been received */
digitalWrite(13, LOW);
}
}
جهت سفارش این کالا، به
این بخش در فروشگاه آفتاب رایانه مراجعه نمایید.


 3 لایک
  LinkBack URL
 About LinkBacks
نوشته اصلی توسط max
 يكي از پراستفاده ترين مدارهاي الكترونيكي ، مدارهاي كنترل از راه دور ميباشد. روز به روز بر تعداد تجهيزاتي كه انتقال اطلاعات و كنترل را بصورت wireless انجام ميدهند افزوده ميشود . ماژولهاي فرستنده و گيرنده mx-fs-03v و mx-05v يكي از ساده ترين ماژولهاي انتقال اطلاعات به شمار ميروند . انتقال اطلاعات در اين ماژولها تنها از طريق 1 پين صورت ميپذيرد.و در مواردي كه از نظر تعداد پايه هاي آردوينو با محدوديت مواجه هستيم ، اين ويژگي ميتواند بسيار مفيد باشد.


 پاسخ با نقل قول