Features :
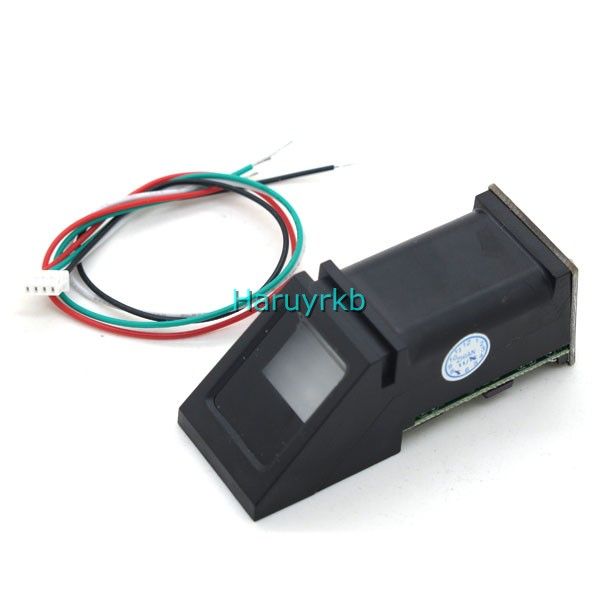
Secure your project with biometrics - this all-in-one optical fingerprint sensor will make adding fingerprint detection and verification super simple. These modules are typically used in safes - there's a high powered DSP chip that does the image rendering, calculation, feature-finding and searching. Connect to any microcontroller or system with TTL serial, and send packets of data to take photos, detect prints, hash and search. You can also enroll new fingers directly - up to 162 finger prints can be stored in the onboard FLASH memory. There's a red LED in the lens that lights up during a photo so you know its working. There are basically two requirements for using the optical fingerprint sensor. First is you'll need to enroll fingerprints - that means assigning ID #'s to each print so you can query them later. Once you've enrolled all your prints, you can easily 'search' the sensor, asking it to identify which ID (if any) is currently being photographed. You can enroll using the windows software (easiest and neat because it shows you the photograph of the print) or with the Arduino sketch (good for when you don't have a windows machine handy or for on-the-road enrolling)
Enrolling new users with WindowsThe easiest way to enroll a new fingerprint is to use the Windows software. The interface/test software is unfortunately windows-only but you only need to use it once to enroll, to get the fingerprint you want stored in the module.
First up, you'll want to connect the sensor to the computer via a USB-serial converter. The easiest way to do this is to connect it directly to the USB/Serial converter in the Arduino. To do this, you'll need to upload a 'blank sketch' this one works well:
// this sketch will allow you to bypass the Atmega chip // and connect the fingerprint sensor directly to the USB/Serial // chip converter. // Red connects to +5V // Black connects to Ground // White goes to Digital 0 // Green goes to Digital 1 void setup() {} void loop() {}
Wire up the sensor as described in the sketch comments after uploading the sketch. Since the sensor wires are so thin and short, we stripped the wire a bit and melted some solder on so it made better contact but you may want to solder the wires to header or similar if you're not getting good conteact. When you plug in the power, you should see the red LED blink to indicate the sensor is working.
SFGDemo Software download:
Start up the SFGDemo software and click Open Device from the bottom left corner. Select the COM port used by the Arduino
 And press OK when done. You should see the following, with a blue success message and some device statistics in the bottom corner. You can change the baud rate in the bottom left hand corner, as well as the "security level" (how sensitive it is) but we suggest leaving those alone until you have everything running and you want to experiment
 Lets enroll a new finger! Click the Previewcheckbox and press the Enroll button next to it (Con Enroll means 'Continuous' enroll, which you may want to do if you have many fingers to enroll). When the box comes up, enter in the ID # you want to use. You can use up to 162 ID numbers.
The software will ask you to press the finger to the sensor
Lets enroll a new finger! Click the Previewcheckbox and press the Enroll button next to it (Con Enroll means 'Continuous' enroll, which you may want to do if you have many fingers to enroll). When the box comes up, enter in the ID # you want to use. You can use up to 162 ID numbers.
The software will ask you to press the finger to the sensor
 You can then see a preview (if you cliecked the preview checkbox) of the fingerprint
 You will then have to repeat the process, to get a second clean print. Use the same finger!
On success you will get a notice
You will then have to repeat the process, to get a second clean print. Use the same finger!
On success you will get a notice
 If there's a problem such as a bad print or image, you'll have to do it again
Searching with the softwareOnce you have the finger enrolled, it's a good idea to do a quick test to make sure it can be found in the database. Click on the Search button on the right hand side When prompted, press a different/same finger to the sensor
If it is the same finger, you should get a match with the ID #
If there's a problem such as a bad print or image, you'll have to do it again
Searching with the softwareOnce you have the finger enrolled, it's a good idea to do a quick test to make sure it can be found in the database. Click on the Search button on the right hand side When prompted, press a different/same finger to the sensor
If it is the same finger, you should get a match with the ID #
 If it is not a finger in the database, you will get a failure notice
 Wiring for use with ArduinoOnce you've tested the sensor, you can now use it within a sketch to verify a fingerprint. We'll need to rewire the sensor. Disconnect the green and white wires and plug the green wire into digital 2 and the white wire to digital 3. You can change these pins later but for now, use the default pins. Since the sensor wires are so thin and short, we stripped the wire a bit and melted some solder on so it made better contact but you may want to solder the wires to header or similar if you're not getting good contact. When you plug in the power, you should see the red LED blink to indicate the sensor is working.
Next, To download click the DOWNLOADS button in the top right corner, rename the uncompressed folder Adafruit_Fingerprint. Check that the Adafruit_Fingerprint folder contains Adafruit_Fingerprint.cpp and Adafruit_Fingerprint.h Place the Adafruit_Fingerprint library folder your <arduinosketchfolder>/libraries/ folder. You may need to create the libraries subfolder if its your first library. Restart the IDE.
Once you've restarted you should be able to select the File→Examples→Adafruit_Fingerprint→fingerpri nt example sketch. Upload it to your Arduino as usual. Open up the serial monitor at 9600 baud and when prompted place your finger against the sensor that was already enrolled.
You should see the following:
Wiring for use with ArduinoOnce you've tested the sensor, you can now use it within a sketch to verify a fingerprint. We'll need to rewire the sensor. Disconnect the green and white wires and plug the green wire into digital 2 and the white wire to digital 3. You can change these pins later but for now, use the default pins. Since the sensor wires are so thin and short, we stripped the wire a bit and melted some solder on so it made better contact but you may want to solder the wires to header or similar if you're not getting good contact. When you plug in the power, you should see the red LED blink to indicate the sensor is working.
Next, To download click the DOWNLOADS button in the top right corner, rename the uncompressed folder Adafruit_Fingerprint. Check that the Adafruit_Fingerprint folder contains Adafruit_Fingerprint.cpp and Adafruit_Fingerprint.h Place the Adafruit_Fingerprint library folder your <arduinosketchfolder>/libraries/ folder. You may need to create the libraries subfolder if its your first library. Restart the IDE.
Once you've restarted you should be able to select the File→Examples→Adafruit_Fingerprint→fingerpri nt example sketch. Upload it to your Arduino as usual. Open up the serial monitor at 9600 baud and when prompted place your finger against the sensor that was already enrolled.
You should see the following:
 The 'confidence' is a score number (from 0 to 255) that indicates how good of a match the print is, higher is better. Note that if it matches at all, that means the sensor is pretty confident so you don't have to pay attention to the confidence number unless it makes sense for high security applications.
If you want to have a more detailed report, change the loop() to run getFingerprintID() instead of getFingerprintIDez() - that will give you a detailed report of exactly what the sensor is detecting at each point of the search process.
Enrolling with ArduinoWe did put together a simple sketch for enrolling a new finger via Arduino - its not as easy to use as the Windows program but it does work. Run the File→Examples→Adafruit_Fingerprint→enroll sketch and upload it to the Arduino, use the same wiring as above. When you open up the serial monitor, it will ask for you to type in the ID to enroll - use the box up top to type in a number and click Send The 'confidence' is a score number (from 0 to 255) that indicates how good of a match the print is, higher is better. Note that if it matches at all, that means the sensor is pretty confident so you don't have to pay attention to the confidence number unless it makes sense for high security applications.
If you want to have a more detailed report, change the loop() to run getFingerprintID() instead of getFingerprintIDez() - that will give you a detailed report of exactly what the sensor is detecting at each point of the search process.
Enrolling with ArduinoWe did put together a simple sketch for enrolling a new finger via Arduino - its not as easy to use as the Windows program but it does work. Run the File→Examples→Adafruit_Fingerprint→enroll sketch and upload it to the Arduino, use the same wiring as above. When you open up the serial monitor, it will ask for you to type in the ID to enroll - use the box up top to type in a number and click Send
 Then go through the enrollment process as indicated. When it has successfully enrolled a finger, it will print Stored! Then go through the enrollment process as indicated. When it has successfully enrolled a finger, it will print Stored!
 Don't forget to do a search test when you're done enrolling to make sure its all good!
|


 33 لایک
  LinkBack URL
 About LinkBacks


 پاسخ با نقل قول